Wednesday, July 31, 2019
iPhone 11 to Support Apple Pencil
Citi Research has published a report that details list of new features set to arrive with 2019 iPhones. The report claims that iPhone 11 will support Apple Pencil. List of features included an item that read “support for iPhone pencil/stylus.”
The Apple Pencil debuted in 2015 alongside first-generation iPad Pro. As of now, Apple sells two versions of Apple Pencil. One is the older while the other is the newer version that works with new iPad Air, iPad sixth-gen, and iPad Air. In 2018 similar reports about iPhones supporting Apple Pencil surfaced, however, they were untrue. Furthermore, the report also mentioned Apple Pencil support will only be launched if Apple launches a bigger iPhone. We are not sure if Kuo meant an iPhone larger than the XS Max.
Apple Pencil supports all the iPad’s including the 12.9-inch iPad Pro and the 7.9-inch iPad Mini. That being said, the Apple Pencil support for iPhones might come at a later stage and 2019 iPhones may not get the feature.
The rumor mills have been predicting three iPhones this year, similar to last year. There is no confirmation as to what Apple will call the new devices. Major highlights of the upcoming iPhone include triple-rear camera setup, a bigger camera bump, A13 chip, better display, improved FaceID, upgraded 12-megapixel selfie camera and support for Gigabit LTE.
Our Take
I have used styluses on yesteryears devices like Palm and recently on the Galaxy Note. The Stylus or Pen was quickly replaced by scrolling, pinching and other touch gestures on a capacitive touch screen. However, Samsung has managed to retain the demand for smartphones with a stylus. Some of the features like Quick Notes on Galaxy Note series is a great way to jot down stuff without relying on a pen and a paper.
We are pretty sure that Apple will find innovative and utilitarian uses for the Apple Pencil on iPhone. However, the support for Apple Pencil might not arrive on 2019 iPhones. Did you ever feel the need for Apple Pencil while using iPhone? Let us know in the comments below.If you lost data after you updated to a new iPhone, you can always use Gihosoft iPhone Data Recovery to get the data back from the old iPhone or backup.You may also like: iphonerecovery.com
[via Business Insiders]
Friday, July 26, 2019
How to Request a Desktop Website in Safari for iOS
Most popular websites these days come in both desktop and mobile versions, with the latter rendering content in a more responsive fashion for a consistent browsing experience across a variety of tablet and smartphone screens.
Mobile-friendly websites are often stripped down and streamlined for easier navigation, with the result that some full-page content isn't displayed at all. Even when it is, finding that content can sometimes be a chore, especially if you're used to the desktop version of a site.
Fortunately, Apple has had the foresight to let you bypass mobile versions of websites and view original desktop versions on its mobile devices instead. To request a desktop site in Safari on an iPhone or iPad running iOS 13, simply follow these steps.
Navigate to a website that you'd like to view the desktop version of.
Tap the "aA" icon in the top-left corner of the screen to reveal the Website View menu.
Select Request Desktop Website from the dropdown menu.
The great thing about Safari's Website View menu is that it will remember your preferences for that specific website and apply it automatically the next time content is loaded from the same parent URL.
If you want, you can configure Safari to request the desktop website on all the websites you visit. The toggle switch to enable this option can be found in the Settings app, under Safari -> Request Desktop Website. Read more:Watch Thor Ragnarok For Free
Read more:instagram for pc
Wednesday, July 10, 2019
Ultimate Method to Unlock T-Mobile iPhone
How to Unlock T-Mobile iPhone without Hassle
Buying an iPhone that is SIM carrier locked is always huge stress on the buyer, but with reliable Doctorsim, it’s now possible to T-Mobile unlock iPhone without much stress.
The T-Mobile iPhone unlocking service provided by Doctorsim.com team would easily unlock your device and let you use a new SIM card in a formerly locked T-Mobile iPhone. This unlocking service cost the least and can be completed in 1 day from the moment you made payment and the receipt confirmed.
Why Do Most People Choose DoctorSIM?
Unlocking iPhone from T-Mobile online is legal and permanent. DoctorSIM isn’t using “hacking” way. iPhone won’t be relocked in the future.
Money back guarantee is available to those whom they are not able to unlock their iPhone for any reason.
Warranty won’t be avoided. Your phone’s hardware or software won’t be damaged.
iPhone unlocking specialists are available 24 hours a day and 7 days a week.
1000+ phones supported; 100+ network providers supported; 60+ countries supported.
Unlocking will be completed at the lowest price in the market and with the fast speed.
Click to Unlock >>
1
How to Unlock T-Mobile Carrier Lock from iPhone:
Get your iPhones IMEI number to process the request. You can dial “#06” on your iPhone to get it.
Go to www.doctorsim.com and select the model of your iPhone.
Under network provider, select T-Mobile.
Study the descriptions before selecting the cell phone unlocking service that is applicable to your device.
Input your iPhone’s IMEI number and email address in the fields, and choose a favorable payment method.
You’ll receive an email confirmation with instructions on how to unlock your iPhone.
2
Authentic User Reviews of DoctorSIM:
DoctorSIM has over 6,000 user reviews on Trustpilot, among which 85% rated it as Excellent. Some of the reviews say:
Of course, there are a few bad reviews which complained that it took a few days to complete. But none of the review complained about the refund. So why not give DoctorSIM a trial. If they could not unlock it finally, you won’t lose your money as well. Give yourself a chance.
How to Unlock T-Mobile iPhone by Contacting the Carrier
Do you prefer to unlock your T-Mobile locked iPhone from the carrier? If your answer is yes, then you can approach your nearest store T-Mobile store and ask them to unlock your device. However, before going to the store to request for help, make sure the following unlocking eligibility features are met:
If you can meet all these criteria, then you can refer to the T-Mobile Device Unlock app or contacting the customer support hotline (1-877-746-0909). You’ll get the carrier’s approval and instructions to unlock your iPhone from T-Mobile.
When it’s done, you just need to:
Plug the new SIM card into your iPhone card slot.
Power on your device.
Follow the instructions to complete the setup.
Sponsor ads:
Gihosoft RePicvid Free Photo Recovery Software provides a free photo recovery software for windows to help users recover the deleted or lost photo for free.
If you lost data after you updated to a new iPhone, you can always use Gihosoft iPhone Data Recovery to get the data back from the old iPhone or backup.You may also like: iphonerecovery.com
Thursday, July 4, 2019
How to Edit a Video on iPhone and iPad
In iOS 13, Apple has enhanced the built-in photo and video editing capabilities available to iPhone and iPad users, and for the first time it has made many of its stock photo adjustment tools available for editing videos.
In addition to the new video editing options, Apple has introduced a new tool selection interface that makes the whole process quicker and easier than ever before. Let's take a look at how it works.
Launch the stock Photos app on your iPhone or iPadand select a video clip from your Photo library using the Photos tab. If it isn't a recent video that you want to edit, use the Days, Months, and Years views to whittle down your collection, or select a clip from one of your albums via the Albums tab.
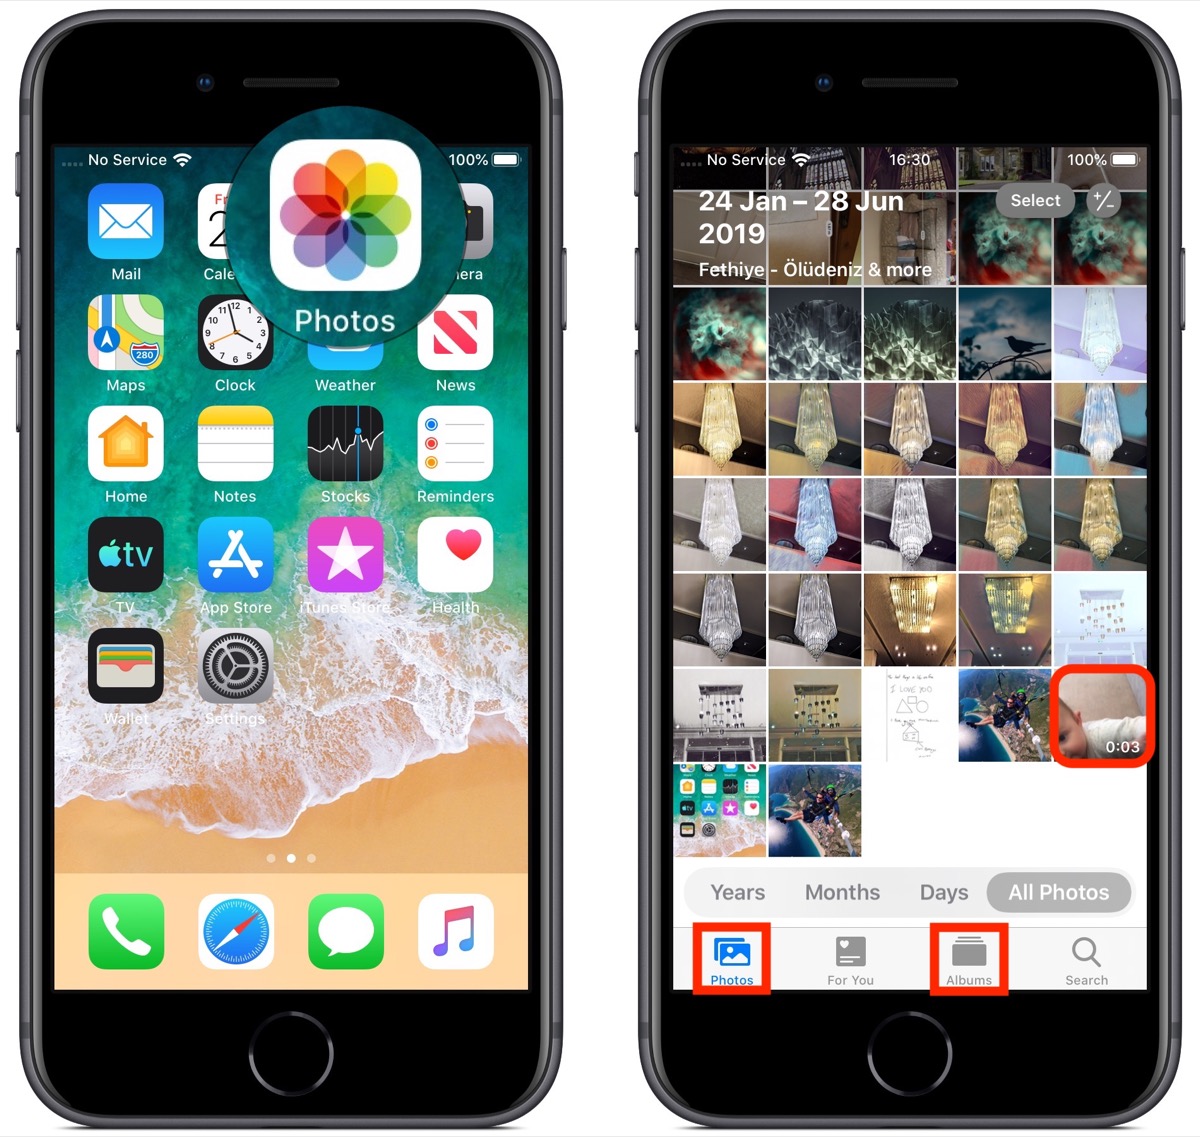
Once you've selected a video, tap Edit in the top-right corner of the screen. When the black-bordered editing interface appears, you'll notice four icons between the Cancel and Done options at the bottom of the screen.
Trimming a Video
The first film camera-shaped icon is the default selection, and gives you quick access to the timeline. The timeline appears below the video, and you can use it to scrub through a clip or trim it.
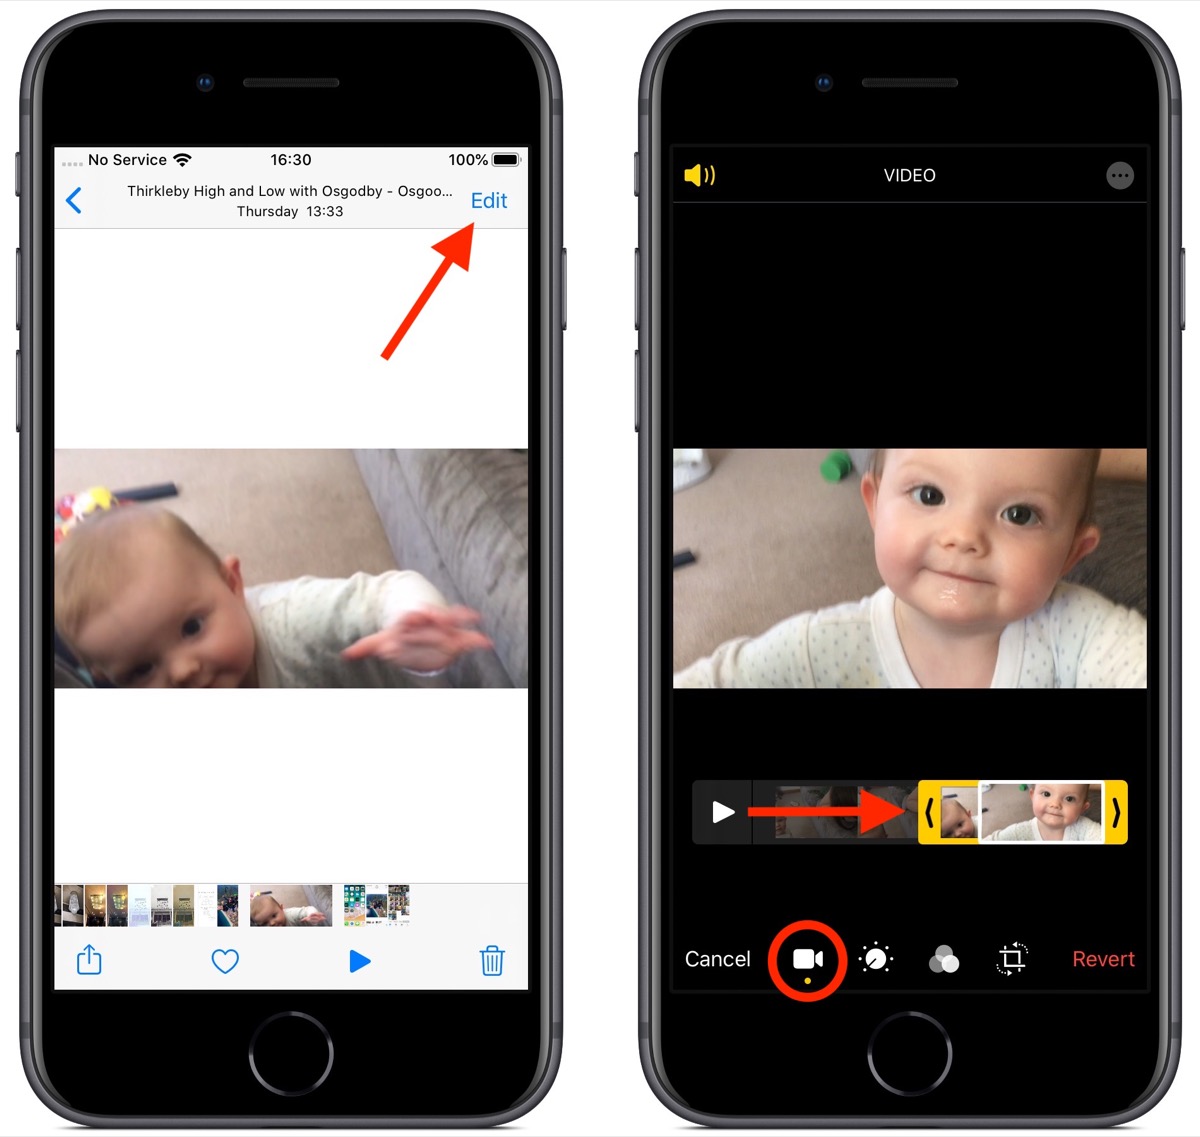
To trim the clip, drag the yellow chevrons to include the portion you wish to keep – anything outside the yellow frame will be discarded when you tap Done.
Adjustment Tools
The next option in the row of icons at the bottom of the editing interface looks like a control knob. Tapping this opens the Adjust tools in a horizontal strip below your video. Tap Auto – the first tool in the strip – and you'll notice the horizontal dial light up below the toolset.
Auto uses intelligent algorithms to optimally tune the other tools and enhance your video, but you can manually adjust its intensity level by moving the dial with a swipe of your finger. You can easily return to the auto-tuned level by returning the dial back to the white dot.
Swipe along the strip of other tools and you'll find that they all work similarly. The only difference is that when you swipe along the dial to change the adjustment level, the selected tool's icon will display a number that you can use as a reference to refine the effect you're previewing.
The other adjustment tools available in the horizontal strip include Exposure, Highlights, Shadows, Contrast, Brightness, Black Point, Saturation, Vibrance, Warmth, Tint, Sharpness, Definition, Noise Reduction, and Vignette. Simply tap Done when you're happy to apply and save your adjustments.
The Filters Tool
The third option in the row of icons along the bottom of the editing interface looks like a Venn diagram. Tapping this icon opens the Filters tool, which allows you to apply an Instagram-style filter to your captured videos in just a few quick taps.
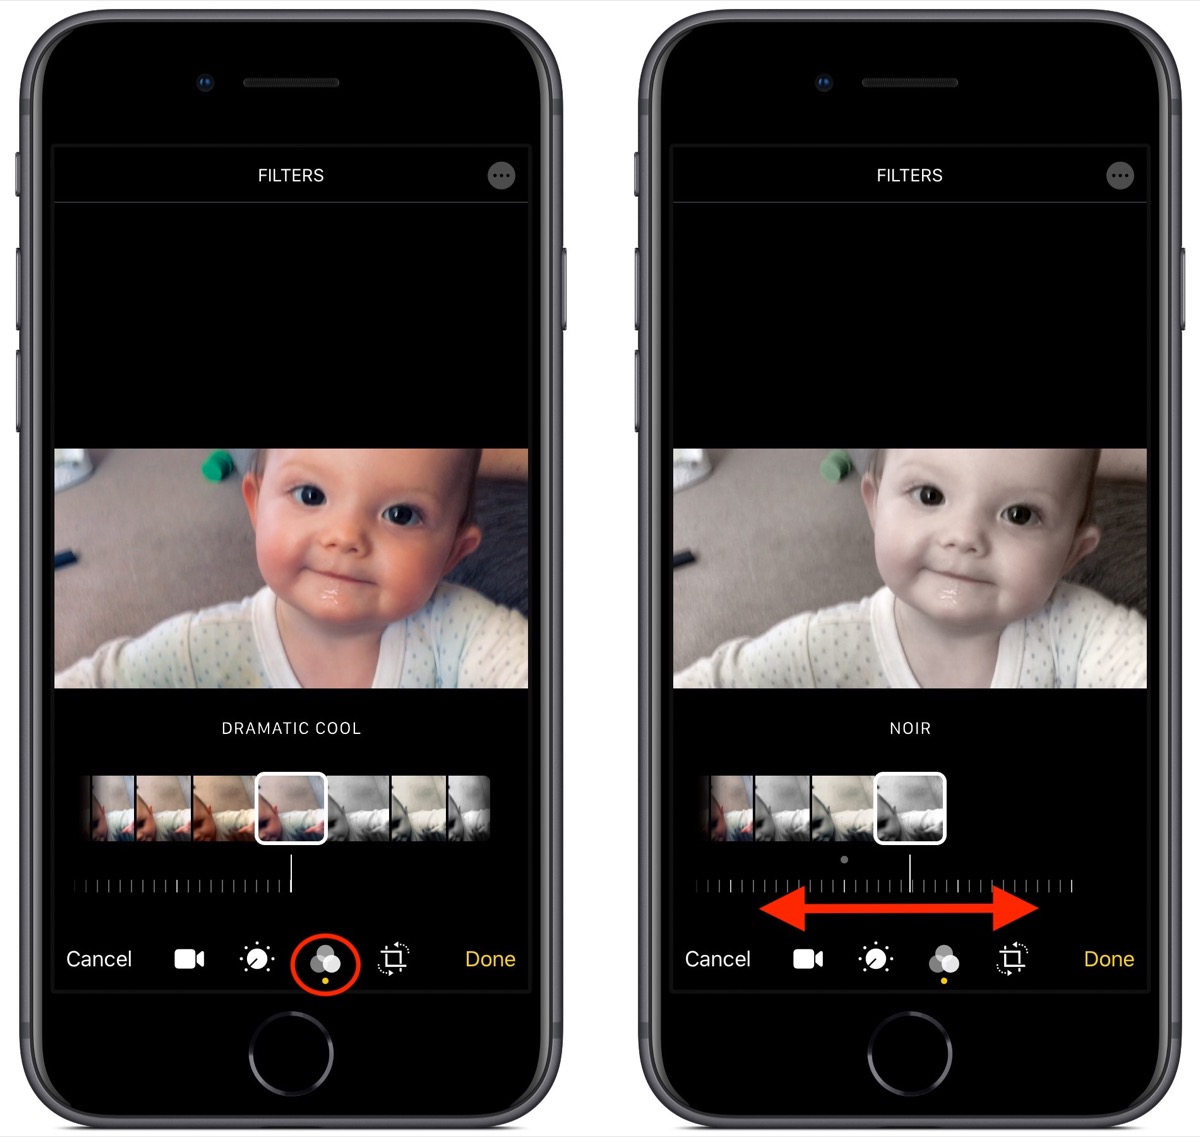
Swipe through the nine available filters to get a preview of how your video looks when each one is applied. Let your finger come to a rest, and a horizontal dial will appear below the selected filter.
Use you finger to move the dial and adjust the intensity level of the filter. Tap Done in the bottom right of the screen to apply the filter effect to your video.
Cropping Tools
The fourth and final icon at the bottom of the editing interface opens the cropping tools. You can easily crop a video using the grid overlay that appears by dragging at its corners, just like you would for photos.
Notice that you also now have a row of three additional adjustment tools associated with the dial below them. From left to right, these allow you to straighten the video, adjust its vertical alignment, and adjust its horizontal alignment.
Tap one of the tools and move the dial with a swipe of your finger to adjust to the desired level, indicated by the number in the selected icon.
Running along the top of the video editing interface you'll notice more tools to flip and rotate the video on the left, and apply preset crop ratios on the right. You can tap the Reset button between these tools to undo your adjustments, or press Done if you're happy with your edits.
Lastly, it's worth remembering that you can access all of these editing tools whenever you capture video using the built-in Camera app – you don't even have to unlock your device to use them on the clip you just shot. Sponsor ads:
Gihosoft RePicvid Free Photo Recovery Software provides a free photo recovery software for windows to help users recover the deleted or lost photo for free.
If you lost data after you updated to a new iPhone, you can always use Gihosoft iPhone Data Recovery to get the data back from the old iPhone or backup.You may also like: iphonerecovery.com
Subscribe to:
Posts (Atom)
Updated Mac Configuration Utility Hints at Imminent Apple Mac Pro Launch
Apple Mac Pro was announced last month alongside new iPhones, iPad, Apple Watch. During the launch, the company didn’t specify the exact rel...
-
1. How to Send Existing GIFs in WhatsApp on iPhone With the latest version of WhatsApp installed on your iPhone, follow these simple steps t...
-
In iOS 13 , Apple has enhanced the built-in photo and video editing capabilities available to iPhone and iPad users, and for the first time...
-
Tip 1. Delete Older iCloud Backups It is possible that the lack of adequate storage is causing the issue. In this case, deleting some of the...