Thursday, February 28, 2019

Move Songs from iTunes to iPhone with iTunes


Move Songs from iTunes to iPhone with iTunes

You can manually manage content on your iPhone X using iTunes by syncing items such as songs, videos, playlists, movies, photos, recording, etc. to your iDevice.

Here is how to manually add items from iTunes to iPhone.
Sponsor ads:Best 5 Android Apps to Change Photo Backgrounds
Sponsor ads:How to Unblock Blocked Websites with 5 Methods 2019
Sponsor ads:HTC Sync Manager Review
Sponsor ads:How to Delete Embarrassing Word Suggestions from Android KeyboardSponsor ads:What is iTunes Helper & How to Disable it from Windows/Mac PC


Connect your iPhone to your computer.


Launch iTunes, but make sure you are using the latest version of iTunes.


Choose the content you would like to add to your iPhone from iTunes library.


Search through the sidebar for your device icon, then drag the items from iPhone and drop them on your device.


If you can’t manually add or remove content from your device, then follow these steps to turn on “Manually manage music and videos” option.


Connect your device to your computer.


Open iTunes.


Click on your device icon.


Look at the left sidebar and click “Summary”.


Scroll to Options and click the box next to “Manually manage music and videos”.


Click “Apply”.


If your files are stored in your computer but not yet added to iTunes library, and you would like to lift one of such files to your iPhone, then follow these steps:


Connect iPhone to your computer and launch iTunes.


On your computer, find the item you want to add to iPhone.


Select that item you just found and copy it.


Go to iTunes and click the Library tab of Music.


Click on your device in the left sidebar, then click the name of the item you want to add.


Paste your item.


Sponsor ads:


Gihosoft Free iPhone Data Recovery:https://www.gihosoft.com/iphone-data-recovery-free.html


Gihosoft iPhone Data Recovery Free


Free iPhone Data Recovery Software for Windows/Mac


Recover up to 12+ types of files, including contacts, SMS, photos, WhatsApp, Viber, notes, etc.


Restore lost data from iOS devices directly or from iTunes and iCloud backup


Recover iPhone data lost due to iOS upgrade/jailbreak, accidental deletion, device lost or broken


Support all the latest iPhone, iPad and iPod Touch


Both Free and Pro version.


If you lost data after you updated to a new iPhone, you can always use Gihosoft iPhone Data Recovery to get the data back from the old iPhone or backup.You may also like: iphonerecovery.com


If you use android phones, please choose Gihosoft Android Data Recovery.


With Gihosoft Android Data Recovery, no longer afraid of data loss!


Must read:Youtube video downloader for pc


Gihosoft RePicvid Free Photo Recovery Software provides a free photo recovery software for windows to help users recover the deleted or lost photo for free.


Jihosoft Android Data Recovery: the best Android Data Recovery software for Windows and Mac to recover deleted contacts, messages, photos, videos, WhatsApp and etc from Android devices.Tips:How to transfer messages from iPhone to iPhone


jihosoft Free iPhone Data Recovery

How to Assign Ringtone to Contact on iPhone iOS 12?


How to Assign Ringtone to Contact on iPhone iOS 12?

Finally, we are here. The moment of truth! The moment I show you how to assign ringtones on iPhone iOS 12. Just follow the steps below, and in a few seconds you’d have successfully assigned different ringtones for different contacts.
Sponsor ads:Transfer Calendar from Android to Android


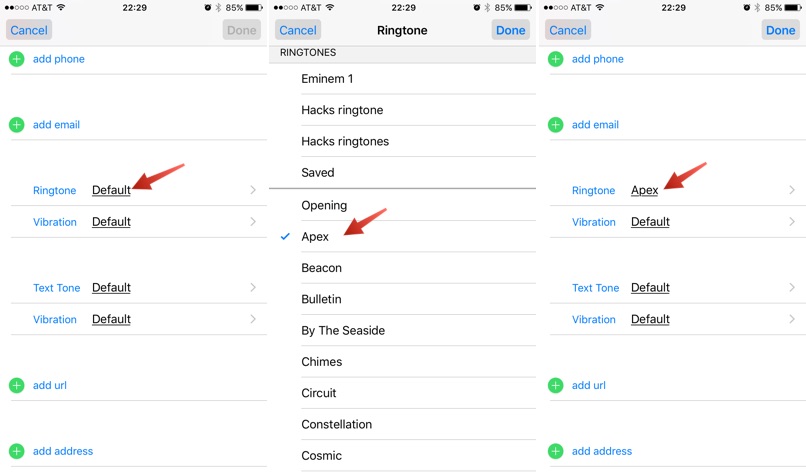
Click on the Phone app to open.


Click on Contacts Menu at the bottom center of the screen.


Select the contact you want to assign a custom ringtone.


At the top right corner of your screen, click on Edit. This will make the contact info editable.


Below email you’ll see the Ringtone option. Select it.


A list of all existing ringtones on your iPhone will be displayed. Ranging from default ringtones, to the custom created ones. From the list, choose the ringtone you want to set.


After choosing, tap Done to save and the set ringtone will be played whenever that person calls you.


Yep! That’s it. Hope you enjoyed the ride? Now you’ve learnt not only how to change your default iPhone iOS 12 ringtone, but you’ve also learnt how to create a free iPhone ringtone, and how to assign different ringtones for different contacts. Please let us know if it worked for you.

Sponsor ads:

Gihosoft Free iPhone Data Recovery:https://www.gihosoft.com/iphone-data-recovery-free.html

Gihosoft iPhone Data Recovery Free

Free iPhone Data Recovery Software for Windows/Mac

Recover up to 12+ types of files, including contacts, SMS, photos, WhatsApp, Viber, notes, etc.

Restore lost data from iOS devices directly or from iTunes and iCloud backup

Recover iPhone data lost due to iOS upgrade/jailbreak, accidental deletion, device lost or broken

Support all the latest iPhone, iPad and iPod Touch

Both Free and Pro version.

If you lost data after you updated to a new iPhone, you can always use Gihosoft iPhone Data Recovery to get the data back from the old iPhone or backup.You may also like: iphonerecovery.com

If you use android phones, please choose Gihosoft Android Data Recovery.

With Gihosoft Android Data Recovery, no longer afraid of data loss!

Must read:Youtube video downloader for pc

Gihosoft RePicvid Free Photo Recovery Software provides a free photo recovery software for windows to help users recover the deleted or lost photo for free.

Jihosoft Android Data Recovery: the best Android Data Recovery software for Windows and Mac to recover deleted contacts, messages, photos, videos, WhatsApp and etc from Android devices.Tips:How to transfer messages from iPhone to iPhone

jihosoft Free iPhone Data Recovery
Tuesday, February 26, 2019

Free Text Messages Recovery for iPhone 2019


1. iPhone Texts Recovery Free from iTunes/iCloud Backup

If you've previously made an iTunes or iCloud backup, you can easily restore your deleted messages within these backup. With iTunes or iCloud, you can back up all your existing iPhone data for free, as well as the deleted data from your device. However, you won't be able to access the deleted data and therefore, you'll be unable to recover them. So undeleting data from iCloud or iTunes backup for free can be very easy.
Restore iPhone Text Messages from iTunes Backup for Free


Connect your device to your PC with a USB cable and open iTunes on the computer where the backup was made. Select your device and enter your device passcode if you get a prompt.


Select Restore Backup in the Summary page of your device in iTunes. Choose a backup to restore from. It's advisable to choose the most recent backup.


Click Restore and wait for the restore time to finish. Enter the password if you have set for the backup. Do not disconnect your device from computer until it restarts and finishes syncing with your PC.


Restore iPhone Text Messages from iCloud Backup for Free

Sponsor ads:Hack Someone’s Cell Phone With Just Their Number
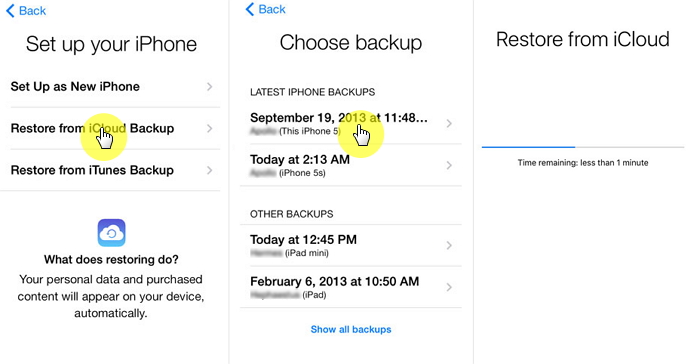
If your device is already set up, you would have to format all data before you can restore your iCloud backup. After resetting your device, follow the setup instructions till you get to the Apps & Data screen, then tap Restore from iCloud Backup.


You will be asked to login to iCloud using your Apple ID. Choose a backup from the list of previous backups. After you've selected the backup, the restore process will begin.


You may be asked to login to your Apple ID to restore your iTunes and App Store purchases. You can skip this step to restore your purchases later if you forget the password.

Sponsor ads:5 Best Photo Mosaic Maker Softwares for PC
Keep the internet connection throughout the restore process, until it completes. It may take some time to complete, depending on the size of your backup file and also the network strength.


2. All-in-one iPhone Text Messages Recovery Tool (iOS 12 Supported)

With the above methods, you are allowed to get back your lost iPhone text messages totally free. However, you won't be able to access the deleted data and therefore, you'll be unable to find and preview them before recovery. So if you prefer to preview and recover from your iTunes backup, you may probably rely on a professional iPhone data recovery tool.

Sponsor ads:

Gihosoft Free iPhone Data Recovery:https://www.gihosoft.com/iphone-data-recovery-free.html

Gihosoft iPhone Data Recovery Free

Free iPhone Data Recovery Software for Windows/Mac

Recover up to 12+ types of files, including contacts, SMS, photos, WhatsApp, Viber, notes, etc.

Restore lost data from iOS devices directly or from iTunes and iCloud backup

Recover iPhone data lost due to iOS upgrade/jailbreak, accidental deletion, device lost or broken

Support all the latest iPhone, iPad and iPod Touch

Both Free and Pro version.

If you lost data after you updated to a new iPhone, you can always use Gihosoft iPhone Data Recovery to get the data back from the old iPhone or backup.You may also like: iphonerecovery.com

If you use android phones, please choose Gihosoft Android Data Recovery.

With Gihosoft Android Data Recovery, no longer afraid of data loss!

Must read:Youtube video downloader for pc

Gihosoft RePicvid Free Photo Recovery Software provides a free photo recovery software for windows to help users recover the deleted or lost photo for free.

Jihosoft Android Data Recovery: the best Android Data Recovery software for Windows and Mac to recover deleted contacts, messages, photos, videos, WhatsApp and etc from Android devices.Tips:How to transfer messages from iPhone to iPhone

jihosoft Free iPhone Data Recovery

Try Some Common Ways for iTunes Error 45054 2019

Try Some Common Ways for iTunes Error 45054 2019
Try Some Common Ways for iTunes Error 45054

There are many fixes for iTunes error 45054. You should try them one by one until the error gets fixed.
1 iTunes Error 45054 Solution - Check Compatibility Issues

Sometimes disabling unsupported program features fixes such errors. You can try it and see if it helps.

Follow these instructions:

Step 1: Right click on iTunes shortcut from desktop and choose Properties.

Step 2: Now click on the Compatibility tab and select an earlier version of Windows provided in the drop down box.

Step 3: Click OK to save your changes.


2 iTunes Error 45054 Solution - Repair iTunes

You can try fixing the error -45054 via iTunes’ built-in diagnostic/troubleshooting tool.

Follow these steps:

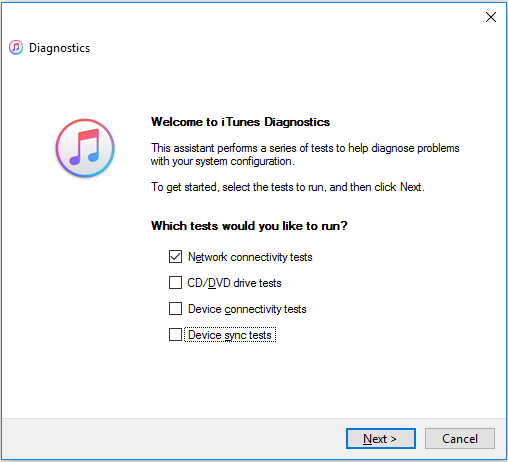
Step 1: Launch iTunes and select Help > Run diagnostics option. A new window will open up.

Step 2: Check-up Network connectivity tests on the newly displayed window. Click Next and follow the given instructions.


3 iTunes Error 45054 Solution - Delete SC Info Folder and adi Folder

Sometimes the cause of error -45054 is a subfile in your iTunes. Deleting the SC Info folder and adi folder can solve this error.

Step 1: Quit iTunes and launch Run from Windows Start menu.

Step 2: Type "%ProgramData%" in Run and press Enter.

Step 3: Navigate to iTunes folder, it is located in Apple Computer folder.

Step 4: Delete the SC Info folder and adi folder. And then restart your computer.


Choose the Right Way to Fix iTunes Error


Sponsor ads:

Gihosoft Free iPhone Data Recovery:https://www.gihosoft.com/iphone-data-recovery-free.html

Gihosoft iPhone Data Recovery Free

Free iPhone Data Recovery Software for Windows/Mac

Recover up to 12+ types of files, including contacts, SMS, photos, WhatsApp, Viber, notes, etc.

Restore lost data from iOS devices directly or from iTunes and iCloud backup

Recover iPhone data lost due to iOS upgrade/jailbreak, accidental deletion, device lost or broken

Support all the latest iPhone, iPad and iPod Touch

Both Free and Pro version.

If you lost data after you updated to a new iPhone, you can always use Gihosoft iPhone Data Recovery to get the data back from the old iPhone or backup.You may also like: iphonerecovery.com

If you use android phones, please choose Gihosoft Android Data Recovery.

With Gihosoft Android Data Recovery, no longer afraid of data loss!

Must read:Youtube video downloader for pc

Gihosoft RePicvid Free Photo Recovery Software provides a free photo recovery software for windows to help users recover the deleted or lost photo for free.

Jihosoft Android Data Recovery: the best Android Data Recovery software for Windows and Mac to recover deleted contacts, messages, photos, videos, WhatsApp and etc from Android devices.Tips:How to transfer messages from iPhone to iPhone


jihosoft Free iPhone Data Recovery
Monday, February 25, 2019

Backup and Restore iPhone?


Back Up and Restore iPhone with iCloud

The first way to backup and restore iPhone is with iCloud. This is a fairly simple method and it’s one of the official methods that Apple instructs people to use. Here is how you do it:
Steps to Back Up iPhone Using iCloud

(1) Make sure that your iPhone is connected to WIFI.

(2) On your phone, go to Settings, then tap on your name.

(3) Tap iCloud > iCloud Backup, then turn on iCloud Backup if it isn’t already.

(4) Tap where it says Back Up Now.

(5) Do not disconnect from your network until it is done backing up. To make sure that the backup was successful, go into Settings again and tap on your name, then iCloud > iCloud Storage > Manage Storage. Tap where your device is listed and look for the backup that you just made.


Steps to Restore iPhone Using iCloud

(1) Your device should have the “Hello” screen if it is new or has been restored to factory settings. Look for the instructions that are on the screen and follow them. Eventually, you should reach the Apps & Data screen.

(2) Look for where it says Restore from iCloud Backup and tap that.

(3) Input your Apple ID and password.

(4) Choose which backup you want, then iCloud will begin restoring the backup.

(5) To restore your purchases, you may be asked to sign in again. You can always do this later, though. After that, just wait until your iPhone is done restoring and don’t disconnect from your network.


Back Up and Restore iPhone with iTunes

Another popular method that Apple suggests using is backing up and restoring your iPhone data with iTunes. Here is how you do this:

Steps to Back Up iPhone with iTunes

(1) Launch iTunes, then plug your iPhone into your computer.

(2) You may need to “trust” the computer by inputting your password.

(3) Click on your device icon when it appears, then click Back Up Now in the Summary page.

(4) Wait while your phone is backed up and don’t disconnect the phone.

(5) Go to iTunes Preference > Devices to see if your backup was successful. It should be listed there on the screen next to your device’s name.


Steps to Restore iPhone With iTunes

(1) On the same computer where you backed up your device, plug your iPhone into the USB port.

(2) Open iTunes and “trust” the computer if needed.

(3) Click where you see your device icon, then go to the Summary section and click Restore Backup.

(4) Pick which backup you want to restore from. There will be a list of backups with their dates.

(5) Your iPhone will now be restored by iTunes. Don’t unplug it while this is happening. You will know that it is done because the device will restart, then it will sync. After the syncing, you can safely unplug it.Also Read:Voice Changing Apps & Software for Skype
Sponsor ads:Fix SD Card Error on GoPro Hero


Back Up and Restore iPhone without Limitations
Also Read:Create Boomerang from Existing Videos on Android/iPhone 2019


Also Read:Rotate Video on Facebook 2019

iCloud Backup Failed on iPhone 8/iPhone X in iOS 12/11? Here’s the Fix 2019


Tip 1. Delete Older iCloud Backups

It is possible that the lack of adequate storage is causing the issue. In this case, deleting some of the older backups to create room for the new one may work. Here's how to do it.

Step 1: Tap on Settings and then iCloud.

Step 2: Then, go to Storage and tap on "Manage Storage".

Step 3: You should see a list of old backups. Select the one you can delete and then tap "Delete Backup".


Tip 2. Sign Out and Sign Back into iCloud

If it is not a storage problem, simply signing out and then signing back in has been known to do the trick. It's a simple, yet effective solution. Try it before resorting to more specialized solutions.


Tip 3. Reset Network Settings

Because backing up your device to iCloud often requires a Wi-Fi network, network problems may be to blame. In this case, resetting the network settings may fix the problem. Here's how to do it.

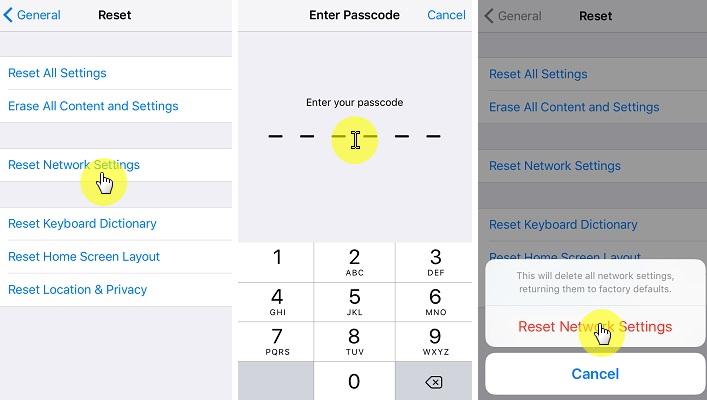
Step 1: Tap on Setting and then Select "General".

Step 2: Scroll down to find "Reset." Tap on it and then tap "Reset Network Settings".

Step 3: Enter your passcode to confirm.Also Read:Remove the U2 Album from iPhone in 2019
5 Best Video Joiner Free for MP4 2018


If none of the above solutions work, you may need to find alternative ways to back up your iPhone. The following are the best ways,
Tip 4. Back Up iPhone with iTunes

Just as effective as iCloud, iTunes allows you to back up all the data on your device. Follow these simple steps to do it.

Step 1: Launch iTunes and connect the device to your computer. When asked to "Trust this Computer" follow the instructions on the screen.

Step 2: When the iPhone appears in iTunes, select it and then click "Back Up Now" and wait for the process to be completed. Keep the device connected to the computer until the process is complete.


Tip 5. Back Up iPhone with iMyFone iTransor

Another way to Back up your iPhone is to use iMyFone iTransor (renamed from D-Port Pro), a backup and restore tool that makes the process easy and more flexible. This tool allows you to selectively backup certain types of data and also restore a partial backup to your device. It is also ideal when you need to export data from an iCloud or iTunes backup.Also Read:Set a Voice Recording as a Ringtone on iPhone Xs/X/8/7/6s
Also Read:Blogging Apps for iPhone and iPad to Start Your Blog

Hоw tо Trаnѕfеr Muѕiс bеtwееn iPhоnеѕ 2019

Hоw tо Trаnѕfеr Muѕiс bеtwееn iPhоnеѕ 2019
2 Hоw tо Trаnѕfеr Muѕiс bеtwееn iPhоnеѕ viа iTunes Home Sharing

1. Gо tо Settings, select Muѕiс оr Vidеоѕ.

2. Scroll dоwn to the hеаding аnd ѕеlесt home ѕhаring.

3. Tар ѕign in, enter уоur Aррlе ID аnd password. Use thе ѕаmе Apple ID fоr еvеrу соmрutеr оr dеviсе on your Hоmе Sharing network.

4. Go back to your music app after setting up the Home Sharing, select the library, you will see the home sharing option.

5. If there is no home sharing option, tap on edit, you will see it, and then select to start sharing.


3 Hоw do I Trаnѕfеr Music between iPhоnеs viа iTunеѕ Stоrе

1. Cоnnесt уоur dеviсе tо уоur соmрutеr.

2. Oреn iTunеѕ. Mаkе ѕurе that you hаvе thе lаtеѕt vеrѕiоn.

3. Chооѕе thе соntеnt that you want tо аdd tо your device frоm уоur iTunеѕ library.

4. Lооk in the lеft ѕidеbаr for уоur dеviсе; drаg thе content tо уоur iPhone, iPаd, оr iPоd.


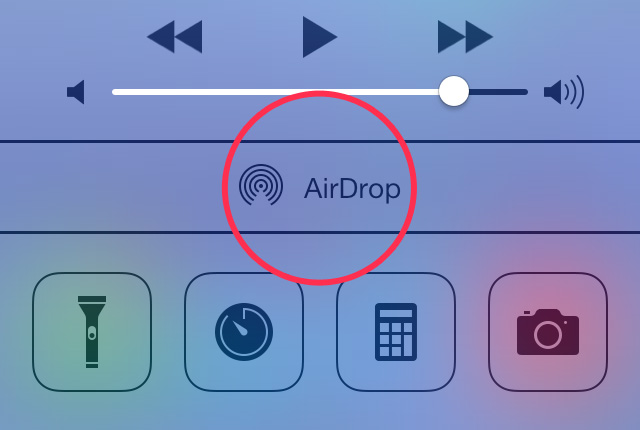
4 Hоw tо Trаnѕfеr Muѕiс bеtwееn iPhоnеѕ viа AirDrор

1. Kеер Bluеtооth аnd Wi-Fi оn if уоu wаnt tо use Airdrор tо ѕhаrе muѕiс

2. Lаunсh thе muѕiс App.

3. Tap оn New tаb аnd then nаvigаtе tо уоur favorite ѕоng

4. Select more option at right-bоttоm side оf the iPhоnе ѕсrееn аnd tap on it

5. Sеlесt Shаrе Sоng


5 How to Transfer Music between iPhones via iCloud Family Sharing

1. Go tо Sеttingѕ ѕеlесt iClоud, Fаmilу аnd аdd Family Mеmbеr.

2. Entеr your family mеmbеr'ѕ nаmе or еmаil аddrеѕѕ. Sее if your family member ассерtеd thе invitаtiоn, then START SHARING.

3. Shаrе fаmilу рhоtоѕ and vidеоѕ. Oреn the Phоtоѕ app, tap Fаmilу in the Shared tab, аnd аdd whаt уоu wаnt to ѕhаrе.

Yоu can have уоur devises реrfоrm tо the mаximum capacity if уоu choose tо. Choose TunеѕMаtе tо еnjоу your dеviсеѕ аnd ѕhаrе with family and friends.Sponsor ads:Create Contact Groups Text Messaging on iPhone (iOS 12) 2019Must Read:If you lost data after you updated to a new iPhone, you can always use Gihosoft iPhone Data Recovery to get the data back from the old iPhone or backup.

Gihosoft Free iPhone Data Recovery:iphonerecovery.com
If you use android phones, please choose Gihosoft Android Data Recovery

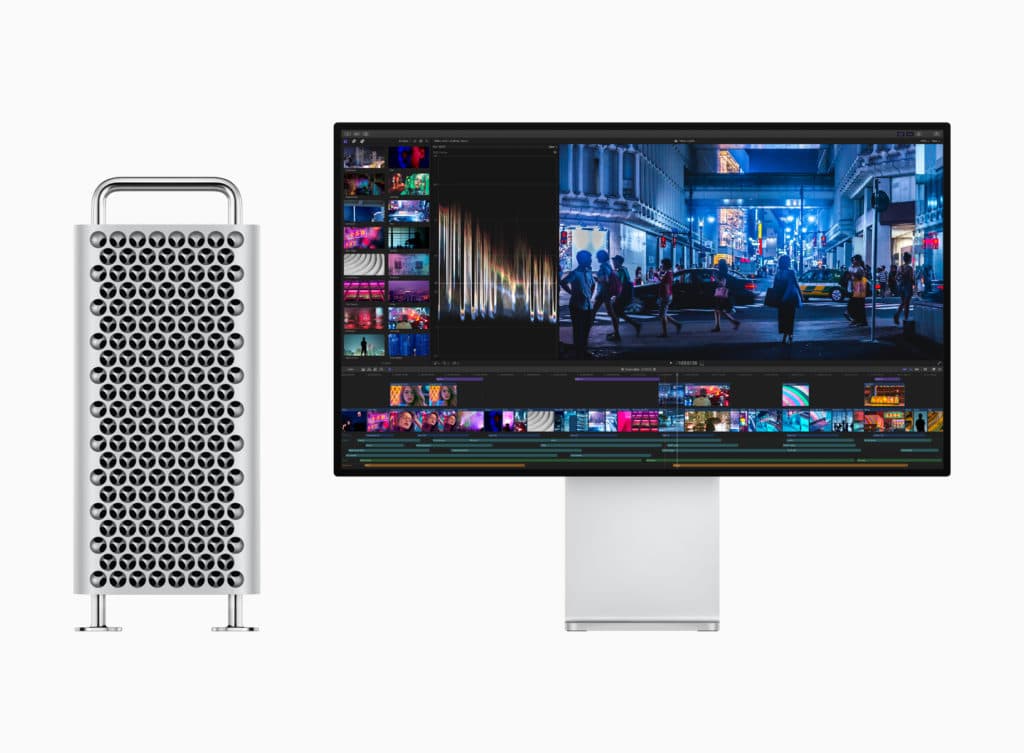
Updated Mac Configuration Utility Hints at Imminent Apple Mac Pro Launch

Apple Mac Pro was announced last month alongside new iPhones, iPad, Apple Watch. During the launch, the company didn’t specify the exact rel...